Website titles
Website title
To add a film title for the website first you must edit the file to put it into the correct format. The film title can be found on the publicity drive. Select the term's folder (eg 'Autumn 2011'), then the folder 'titles' and finally the correct week number. Open the title using photoshop (choose the greyscaled one in tif file format).
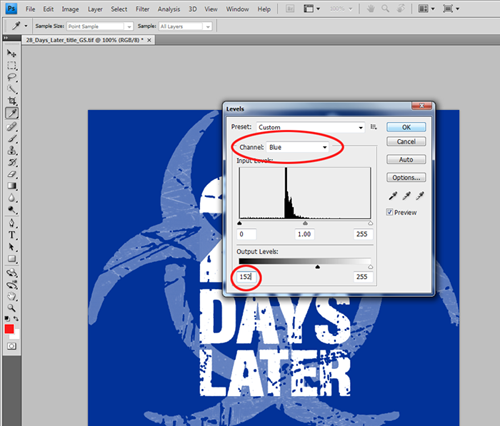
From the tool bar select 'Layer' and then 'Flatten Image' to make the title a single layer. Press Ctrl i to invert the image making the background black. The image then needs to be converted into colour. Select 'Image' from the toolbar followed by 'Mode' and 'RGB Colour'. To convert the background to the same blue as the website press Ctrl L. Change the channel to red/green /blue and then change the minimum output level (bottom left box) to 2/50/152 (see image). Once all three colours have been changed the background should match the website. Finally press Alt+Shift+Ctrl+S (save for web). Press 'Save' and choose a suitable name (normally [film title]_web).
NB/ Make sure not to save over the original file as it may be needed for future publicity designs.
To upload the title, login to the website, go to the schedule and select the correct film. Click on 'Edit film' (just above the film title). Scroll down to 'website title' and select 'browse'. Upload the title you edited earlier. A preview should now appear and, assuming that it is ok, you're done.
If the image does not appear correctly this is often caused by the image file being far too large or small. This can be changed in photoshop by slecting 'Image' followed by 'Image size'.
You can append the following to the address in the address bar of your browser (with the relevant date) to view how the webtitle will appear in the header bar on a given date:
?webtime=10 December 2011
Please note that to use this feature, you must be ticked as Publicity Team.
Ticket title
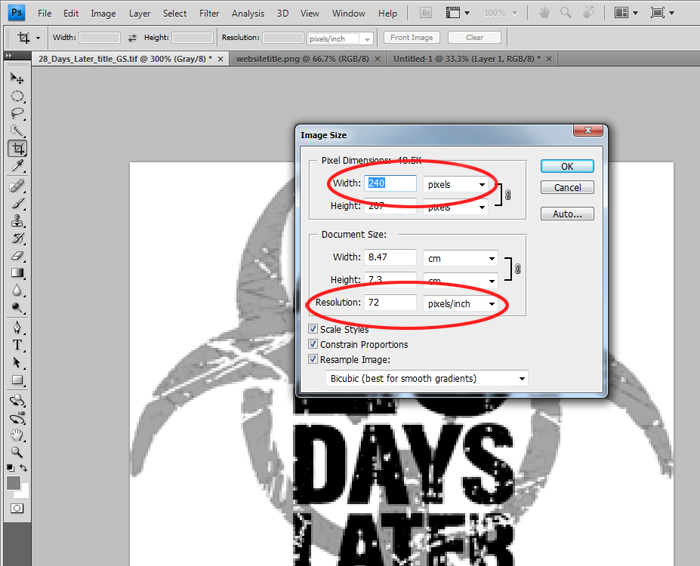
Again, open the film title in photoshop. From the tool bar select 'Layer' and then 'Flatten Image' to make the title a single layer. The ticket title needs to be a certain size so select 'Image' from the toolbar and then 'Image size'. Change the resolution to 72 pixels/inch and then the width to 240 pixels (see picture). Check that the image has been greyscaled by selecting 'Image' from the toolbar and then 'Mode'. 'Greyscale' should be ticked. Finally select 'File' from the toolbar followed by 'Save as'. Save the file in png format and name it [film title]_ticket.
To upload the title, login to the website, go to the schedule and select the correct film. Click on 'Edit film' (just above the film title). Scroll down to 'ticket title' and select 'browse'. Upload the title you edited which should appear as a preview.

