Difference between revisions of "Digital Cinema Content Conversion"
(→Setting up the Workspace) |
|||
| Line 27: | Line 27: | ||
== Setting up the Workspace == |
== Setting up the Workspace == |
||
| − | <br /> [[Image:04_codec_information.PNG|none|frame| |
+ | <br /> [[Image:04_codec_information.PNG|none|frame|Use ''VLC'' to find aspect ratio, resolution and audio channels|left]] <br /> |
<br /> [[Image:05_new_project.PNG|none|frame|Create a new ''Premiere Pro'' project in working folder|left]] <br /> |
<br /> [[Image:05_new_project.PNG|none|frame|Create a new ''Premiere Pro'' project in working folder|left]] <br /> |
||
<br /> [[Image:06_sequence_settings.PNG|none|frame|Choose appropriate sequence settings from custom presets|left]] <br /> |
<br /> [[Image:06_sequence_settings.PNG|none|frame|Choose appropriate sequence settings from custom presets|left]] <br /> |
||
| Line 34: | Line 34: | ||
<br /> [[Image:09_change_scale.PNG|none|frame|Scale video to correct size, ensuring any watermarks are cropped off|left]] <br /> |
<br /> [[Image:09_change_scale.PNG|none|frame|Scale video to correct size, ensuring any watermarks are cropped off|left]] <br /> |
||
<br /> [[Image:10_black_video.PNG|none|frame|Cover MPAA logo, if present, with black video|left]] <br /> |
<br /> [[Image:10_black_video.PNG|none|frame|Cover MPAA logo, if present, with black video|left]] <br /> |
||
| − | |||
== Exporting soundtrack == |
== Exporting soundtrack == |
||
Revision as of 15:34, 25 February 2014
Contents
Introduction
This is a step-by-step guide for converting a video to a Digital Cinema Package (DCP) which we can play from our digital projection system. The main steps are:
- Log on to the WSCDCP account on 192.168.1.36. All necessary software is installed on this computer.
- Obtain the highest quality copy of the source video you can.
- Set up an appropriate sequence in Premiere Pro, based on the aspect ratio and frame rate of the source video.
- Export the soundtrack as a multi-channel WAV file, after volume correction in Soundbooth.
- Export the picture sequence as JPEG2000 files from Premiere Pro, after any necessary scaling, cropping and masking.
- Combine the sound and picture streams into a DCP using OpenDCP.
- Ingest the finished DCP and ensure it gets tested before use in a playlist. You will need a qualified projectionist to help with testing.
Logging in to WSCDCP
- From a computer at Filmsoc, open the Windows Remote Desktop Connection wizard from the start menu. In the computer field, type "192.168.1.36" and click Connect.
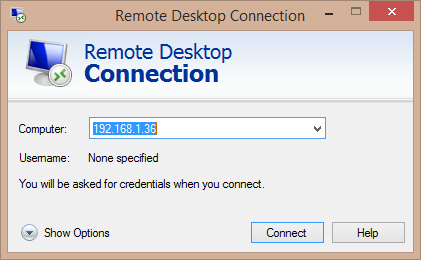 Connect remotely to 192.168.1.36
 - When prompted, enter the username "wscdcp". The password follows the usual Filmsoc password convention. Hit OK. If a window pops up saying "The identity of the remote computer cannot be verified. Do you want to connect anyway?", press Yes.
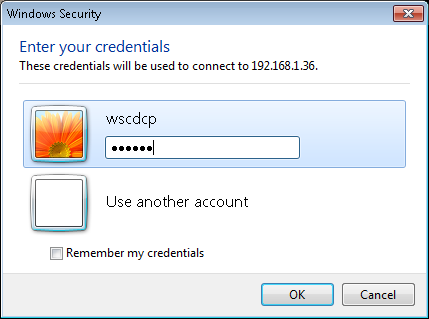 Connect using username "wscdcp"
 - You should now see the Digital Content Conversion desktop. The necessary software (Chrome, Explorer, OpenDCP, Premiere Pro, Soundbooth and VNC Viewer) is all pinned to the taskbar in the bottom left.


Choosing good quality source videos
The most important factor about choosing a video to convert is what quality it is. There are pretty much two factors which affect the quality of a video - the bitrate and the resolution. The bitrate is the amount of information contained per second, and the resolution is the number of pixels in each frame.
Ideally, of course, you want to start with something high bitrate and high resolution. A great place to find HD Trailers at a good bitrate is hd-trailers.net, which has pretty much all recent trailers. The best ones to go for tend to be the HD-trailers own videos (as they don't have watermarks), but they often don't exist, in which case the Apple trailers tend to have the biggest file size.
If you're looking for a trailer from pre 2010, though, chances are you won't find it on HD-Trailers, and it's a bit harder to find good source material. Some videos have high resolution but low bitrate (HD videos on Youtube, for example), and some have high bitrate and low resolution (ripped from DVD, for example). With the digital projection system we use, bitrate seems much more important than resolution, so if you have a choice of source videos, keep that in mind.
Setting up the Workspace


