Designing the booklet
Contents
Introduction
This page describes the guidelines for editors to take you through designing pages for the booklet.
The booklet design can be found on the publicity drive in the term folder (eg Summer 2009) in a subfolder called 'booklet'.
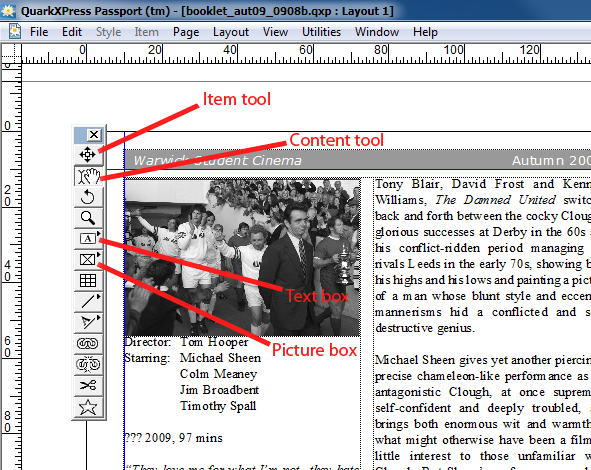
Scroll to the page you are designing. Pages are labelled appropriately with the name of the film for that page. Before you do anything else: using the item tool, select the text box that details the film title and delete it.
Title
-The first thing to add is the title. A picture box for the title is at the top of each page.
-To add the image right click on the box with the content tool, select 'get picture' and then select the title image that is needed (titles are normally in the publicity folder for that term eg 'summer 2009', then in a folder labelled 'titles' and then select the folder for the correct week).
-Press ctrl, alt , shift and F to scale the image to the box.
Text
-Text boxes for the reviews are already on each page, split into two columns.
-Thanks to the IT team, we are able to use a special 'advanced paste' technique that automatically formats the reviews upon pasting them into the text box.
-To launch this, open the 'Shortcut to advanced paste' program on the publicity desktop (the symbol is a reddish H on a white background). The only indication that this is running is a similar H in the system tray (bottom right of screen, by the clock). Note that this step only needs to be done once per editing session (every time you log in).
-Next, load the WSC website (homepage on firefox) and go to the review page for the relevant film (you must be logged in to the website and have editor access).
-Below the list of screenings for that film, you should see a separated text box. Click in this box and use Ctrl+A (select all), then Ctrl+C (copy).
-Go back to Quark, and click within the text box for the relevant review (using the content tool).
-Press Win+V (advanced paste; Win refers to the key with the Windows logo)
-Let the program work its magic as the review pastes and formats automatically. DO NOT touch anything whilst this is happening, just wait until it's completely finished.
-Next, click on the certificate and press Win+C (advanced paste certificate).
-Next, highlight the Date & Time text and press Win+T (advanced paste date+time)
-You will notice the formatting for director is different. This is just a small problem with the program. Simply highlight it, right click and select 'Director' under the 'Paragraph Style Sheet' menu. You will also notice ??? on the line with year and runtime; this is for country of the film which unfortunately is not on our website, so you'll need to look this up (on IMDB, or BBFC) yourself and fill it in.
It's possible the program will make mistakes if something is not exactly as it expects, so watch what it does carefully. For example, it's likely to get horribly confused if a film has multiple reviews.
Pictures
-To insert a picture, create a new picture box using the picture box tool. Then, like with the title, right-click and select 'Get picture' except the images are under a different folder called 'Graphics' (then go to the appropriate week). Ensure to select the .tif version of any image you want to use.
-You can use multiple images, depending on how much room is needed to fit the full review (including the reviewer's name, do not cut this out!).
-If you're confident with Photoshop, you can make cut-outs from graphics and use these in your design. You can also turn images into entire backgrounds (use previous booklet designs for ideas) for a page, although this takes a bit more effort and knowledge about Quark and potentially Photoshop. Be creative, but don't get overambitious!
-If text is too close to any images (or the title), right click on it, select 'Modify', go to the 'Runaround' tab and change the relevant runaround(s) to correct this (5pt is normally good enough).
Important
1) Make sure ALL the images are tifs
2) Save regularly and to a different file each day (if saving on 9th March, save to a new filename, replacing the previous date with 0903 for example. Or, if there is already an 0903 file, save as 0903b and so on).
3) If you're not sure what to do take a look at some of the pages that have already been done or contact the Chief Editor or Publicity Officer.
4) If there are any titles or reviews missing on the drive or website respectively, just leave a space for them and I'll come back to them later.
THANKS FOR HELPING!
