Difference between revisions of "Platter"
m (→Lacing) |
|||
| (9 intermediate revisions by the same user not shown) | |||
| Line 1: | Line 1: | ||
| − | [[Image:Middle Plate to Top Plate |
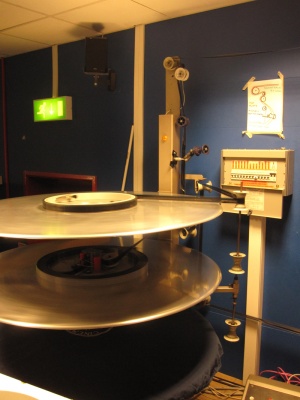
+ | [[Image:Middle Plate to Top Plate 3.jpg|thumb|WSC's Platter in use]]Whilst we prefer to and predominantly play 35mm prints with a two-reel system, Warwick Student Cinema is also able to operate with a long play system. This involves the platter, which was kindly given to us on permanent loan by the Projected Picture Trust in 2002. The platter consists of three giant plates, each approximately 54 inches in diameter. An entire film can be spliced together and placed on one of the plates. It then passes to one of the projectors through a series of rollers before going back to one of the other plates. This is particularly useful in the event of one of the projectors failing, an event which previously would have resulted in the cancellation of the film. |
== General info including safeties == |
== General info including safeties == |
||
| Line 5: | Line 5: | ||
== Platter components == |
== Platter components == |
||
| + | [[Image:Platter Control Box.jpg|thumb|The Platter's control box]][[Image:Laced Brain.jpg|thumb|Lacing of the Brain (here with green mylar to aid visually!)]][[Image:Top Plate and Rollers Laced.jpg|thumb|Off the top plate & rollers]][[Image:Winding On or Off Platter.jpg|thumb|Winding film onto or off of the platter]] |
||
| − | '''a) Control box''' [[Image:Platter Control Box.jpg|thumb|The Platter's control box]] |
||
| + | '''a) Control box''' |
||
| + | |||
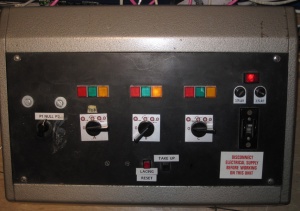
The platter can be turned on and off via the main switch on the right hand side of the box. At the bottom of the box, there are two buttons: one is the ''lacing reset'' button, to tell the platter that the inner ring of the film is about to be used and allows it to adjust its rotation speed as the inner circumference increases during playing. The other is the ''take-up'' button that rotates only the plate onto which the film is being played, causing any slack film to be taken up. |
The platter can be turned on and off via the main switch on the right hand side of the box. At the bottom of the box, there are two buttons: one is the ''lacing reset'' button, to tell the platter that the inner ring of the film is about to be used and allows it to adjust its rotation speed as the inner circumference increases during playing. The other is the ''take-up'' button that rotates only the plate onto which the film is being played, causing any slack film to be taken up. |
||
| − | + | There are three main dials on the box (from left to right, the dials represent the top, middle and bottom plates), each with the same settings available. Pointing at (9 o’clock) leaves the plate off, there are then positions to have film coming from, and on to the plate, as well as connecting it to the platter’s winding bench. Top left on the control box is the P1-Null-P2 switch, which lets the platter know when to spin in connection with the motor of the relevant projector running, or (when set to null) to ignore the projectors. |
|
| + | |||
| + | '''b) The brain''' |
||
| − | '''b) The brain''' [[Image:Laced Brain.jpg|thumb|Lacing of the Brain]] |
||
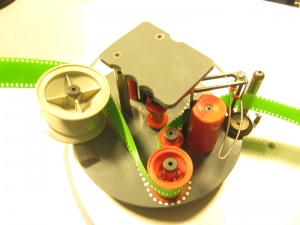
As per the implications of its name, the brain is the `''‘thinking component’'' of the platter. It is placed in the centre of the plate from which the film is to be played, with the moveable arm facing away from the screen. Take care when positioning it, as its connections in the platter are connected to mains electricity. Film enters the brain trough the small gap in the movable arm, after which it flows around several red rollers (following the dotted white line!). |
As per the implications of its name, the brain is the `''‘thinking component’'' of the platter. It is placed in the centre of the plate from which the film is to be played, with the moveable arm facing away from the screen. Take care when positioning it, as its connections in the platter are connected to mains electricity. Film enters the brain trough the small gap in the movable arm, after which it flows around several red rollers (following the dotted white line!). |
||
| − | '''c) Wall rollers''' and safety arm. |
+ | '''c) Wall rollers''' and safety arm. |
| + | |||
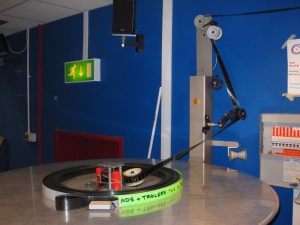
Upon exiting the platter, the film goes to one of the rollers on the girder – these are plate specific! The film then goes up the wall following the paths shown (playing off plate dependent) to the safety mechanism at the top, which will trip if there is a problem with the film in that part of its path. The film then passes onto a roller near the projector’s SDDS unit, through the projector in the usual way and out to a roller about six inches off the floor. From here it returns to the pillar, usually via the adjustable roller, which can be moved forwards or backwards to align it with the roller level to the playing onto plate. The film passes around the arm prior to wrapping around the plastic ring (plate spins anti-clockwise). If this arm slackens to its resting position at any point, then this acts as a safety trip, inferring a film snap, and shutting down the running projector if it is coupled to the platter. |
Upon exiting the platter, the film goes to one of the rollers on the girder – these are plate specific! The film then goes up the wall following the paths shown (playing off plate dependent) to the safety mechanism at the top, which will trip if there is a problem with the film in that part of its path. The film then passes onto a roller near the projector’s SDDS unit, through the projector in the usual way and out to a roller about six inches off the floor. From here it returns to the pillar, usually via the adjustable roller, which can be moved forwards or backwards to align it with the roller level to the playing onto plate. The film passes around the arm prior to wrapping around the plastic ring (plate spins anti-clockwise). If this arm slackens to its resting position at any point, then this acts as a safety trip, inferring a film snap, and shutting down the running projector if it is coupled to the platter. |
||
| − | '''d) Winding bench''' |
+ | '''d) Winding bench''' |
| + | |||
The winding bench is set in front of the platter, at the same level as the middle of the three plates. Once film has been made up onto a 2000 or 6000 foot spool, it can be wound onto the plastic ring on the middle plate, with the foot of the film ending out on the platter. Setting the middle plate to the on/off winding bench setting (see figure above for control box), then allows control of the platter from the dials on the front of the winding bench. |
The winding bench is set in front of the platter, at the same level as the middle of the three plates. Once film has been made up onto a 2000 or 6000 foot spool, it can be wound onto the plastic ring on the middle plate, with the foot of the film ending out on the platter. Setting the middle plate to the on/off winding bench setting (see figure above for control box), then allows control of the platter from the dials on the front of the winding bench. |
||
[[Image:Platter Bench Controls.jpg|thumb|Bench controls on the platter]] |
[[Image:Platter Bench Controls.jpg|thumb|Bench controls on the platter]] |
||
| Line 25: | Line 30: | ||
'''a) Control box set-up''' |
'''a) Control box set-up''' |
||
| + | |||
| − | When preparing to lace the platter, remove the sheet covers for both the plate containing the film to be played and an empty plate on to which the film will wind. All three of the dials should be set to off. Turn on the platter and press the lacing reset button on the platter’s control box. Now set the two relevant dials to their desired positions (film onto or off the relevant plate). Lift the mettle lever on the inside of the plastic ring around which the film is wrapped. This will cause the ring to shrink slightly, allowing it to be lifted out from within the film. Take care to detach the film from the notch in the plastic ring when you lift it out! Once the ring has been removed, push the lever back to parallel with the ring to expand it once more. Then place the ring on the plate to which you wish to play the film, using the small holes in the platter and the small metal dowels on the ring for guidance. |
||
| + | When preparing to lace the platter, remove the sheet covers for both the plate containing the film to be played and an empty plate on to which the film will wind. All three of the dials should be set to off. Turn on the platter and press the lacing reset button on the platter’s control box. |
||
| + | |||
| + | [[Image:Dial - Turned Off, Off Plate, Onto Plate, Winding Bench.jpg|thumb|The four dial positions: (i) off; (ii) winding off the plate; (iii) winding onto the plate; (iv) winding to/from the bench.]]Now set the two relevant dials to their desired positions (film onto or off the relevant plate). Lift the mettle lever on the inside of the plastic ring around which the film is wrapped. This will cause the ring to shrink slightly, allowing it to be lifted out from within the film. Take care to detach the film from the notch in the plastic ring when you lift it out! Once the ring has been removed, push the lever back to parallel with the ring to expand it once more. Then place the ring on the plate to which you wish to play the film, using the small holes in the platter and the small metal dowels on the ring for guidance. |
||
'''b) The brain''' |
'''b) The brain''' |
||
| + | |||
Place the brain into the socket of the plate on which the film is located. Whilst holding the movable arm towards you (to prevent the plate from turning), lace the film through the brain up to the point at which it exits. Remember at all times that the platter can be very dangerous and that as such, especially whilst lacing, projectionists (and their trainees) should not have long untied hair, or dangly jewellery exposed. |
Place the brain into the socket of the plate on which the film is located. Whilst holding the movable arm towards you (to prevent the plate from turning), lace the film through the brain up to the point at which it exits. Remember at all times that the platter can be very dangerous and that as such, especially whilst lacing, projectionists (and their trainees) should not have long untied hair, or dangly jewellery exposed. |
||
| + | [[Image:4 wall rollers picks.jpg|thumb|(i) From the top plate through the safey rollers; (ii) then into projector; (iii) out of projector, and; (iv) back onto platter's middle plate via the safety arm.]]'''c) Wall rollers from and back to the platter''' |
||
| − | '''c) Wall rollers from and back to the platter''' |
||
| + | |||
Once the brain has been laced, follow the instructions as given in section 2c, up to the top of the metal girder, ensuring that the film’s soundtrack remains either (i) up – whilst in the orientation that it occupies whilst on the platter; (ii) towards the wall – whilst running parallel to it, or; (iii) towards you – in the same manner as it is on the projector. From the top of the girder, pull the film (without twisting it!) around the bracket at the top of the projector, then back under, before immediately it to the bottom roller on the platter’s metal girder. Now return the film to the take-up plate via the safety arm, wrapping the film around the plastic ring for a whole rotation. |
Once the brain has been laced, follow the instructions as given in section 2c, up to the top of the metal girder, ensuring that the film’s soundtrack remains either (i) up – whilst in the orientation that it occupies whilst on the platter; (ii) towards the wall – whilst running parallel to it, or; (iii) towards you – in the same manner as it is on the projector. From the top of the girder, pull the film (without twisting it!) around the bracket at the top of the projector, then back under, before immediately it to the bottom roller on the platter’s metal girder. Now return the film to the take-up plate via the safety arm, wrapping the film around the plastic ring for a whole rotation. |
||
| + | [[Image:Middle Plate to Top Plate 2.jpg|thumb|A fully laced platter playing from the middle plate to the top plate]]'''d) Lacing the projector''' |
||
| − | '''d) Lacing the projector''' |
||
| + | |||
Now the film can be pulled onto the rollers above and below the projector, whilst ensuring no twists are made. Then pull excess film down from the top (never pull back on film that is on its way back to the platter from the projector!) Give yourself ample film to lace with in the projector, not worrying about any potential excess between the roller near the bottom of the projector and the bottom roller on the platter’s metal girder. |
Now the film can be pulled onto the rollers above and below the projector, whilst ensuring no twists are made. Then pull excess film down from the top (never pull back on film that is on its way back to the platter from the projector!) Give yourself ample film to lace with in the projector, not worrying about any potential excess between the roller near the bottom of the projector and the bottom roller on the platter’s metal girder. |
||
| Line 45: | Line 56: | ||
== How to leave the platter == |
== How to leave the platter == |
||
| + | |||
| − | Once your (piece of) film has finished and is wrapped around the plastic ring on one of the plates, it is important to leave the platter in a suitable manner. The most important thing to do is to set the platter back to null via the P1/Null/P2 dial. If this is not done, then if the next projectionist tries to project off a reel on the connected projector, then the platter’s arm safety will think there has been a snap and will trip, shutting down the projector. |
||
| + | [[Image:Puck Placement.jpg|thumb|Puck placed at foot end of film, causing a loop to prevent film from slipping when played.]][[Image:Platter Covered.jpg|thumb|Platter covered after being used.]]Once your (piece of) film has finished and is wrapped around the plastic ring on one of the plates, it is important to leave the platter in a suitable manner. The most important thing to do is to set the platter back to null via the P1/Null/P2 dial. If this is not done, then if the next projectionist tries to project off a reel on the connected projector, then the platter’s arm safety will think there has been a snap and will trip, shutting down the projector. |
||
During the Spring and Summer terms, it is common for WSC to use the platter for the ads and trailers reel, as a means to familiarise the trainees with it and when this is done it is crucial to set the platter to null during the first reel of the film, as otherwise, the second reel (played on the same projector as the platter had been) will be shut down via the safety tripping. |
During the Spring and Summer terms, it is common for WSC to use the platter for the ads and trailers reel, as a means to familiarise the trainees with it and when this is done it is crucial to set the platter to null during the first reel of the film, as otherwise, the second reel (played on the same projector as the platter had been) will be shut down via the safety tripping. |
||
Latest revision as of 04:31, 21 January 2010
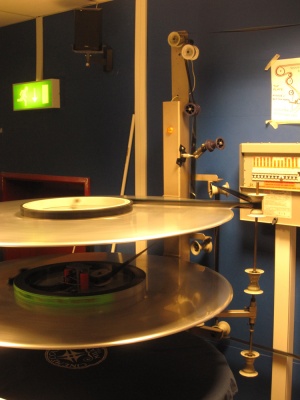
Whilst we prefer to and predominantly play 35mm prints with a two-reel system, Warwick Student Cinema is also able to operate with a long play system. This involves the platter, which was kindly given to us on permanent loan by the Projected Picture Trust in 2002. The platter consists of three giant plates, each approximately 54 inches in diameter. An entire film can be spliced together and placed on one of the plates. It then passes to one of the projectors through a series of rollers before going back to one of the other plates. This is particularly useful in the event of one of the projectors failing, an event which previously would have resulted in the cancellation of the film.
Contents
General info including safeties
The platter is a piece of equipment that allows WSC to show long durations of film without the need to change over between reels. It consists of three large metal plates, off and onto which the film is played, in addition to rollers on the wall and a control box. There is also a bench for winding made-up film onto the middle plate and similarly for taking film off the middle plate. Thus, the platter can be used if there is a significant problem with either of the two projectors that we know about sufficiently in advance of the screening. In order to train projectionists on how to use the platter, the society tends to utilise it for the ads and trailers reel during the spring term. It is also usually used for one or two of the films at the AllNighter.
Platter components
a) Control box
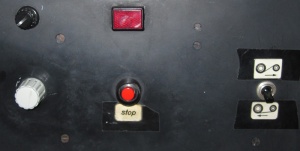
The platter can be turned on and off via the main switch on the right hand side of the box. At the bottom of the box, there are two buttons: one is the lacing reset button, to tell the platter that the inner ring of the film is about to be used and allows it to adjust its rotation speed as the inner circumference increases during playing. The other is the take-up button that rotates only the plate onto which the film is being played, causing any slack film to be taken up.
There are three main dials on the box (from left to right, the dials represent the top, middle and bottom plates), each with the same settings available. Pointing at (9 o’clock) leaves the plate off, there are then positions to have film coming from, and on to the plate, as well as connecting it to the platter’s winding bench. Top left on the control box is the P1-Null-P2 switch, which lets the platter know when to spin in connection with the motor of the relevant projector running, or (when set to null) to ignore the projectors.
b) The brain
As per the implications of its name, the brain is the `‘thinking component’ of the platter. It is placed in the centre of the plate from which the film is to be played, with the moveable arm facing away from the screen. Take care when positioning it, as its connections in the platter are connected to mains electricity. Film enters the brain trough the small gap in the movable arm, after which it flows around several red rollers (following the dotted white line!).
c) Wall rollers and safety arm.
Upon exiting the platter, the film goes to one of the rollers on the girder – these are plate specific! The film then goes up the wall following the paths shown (playing off plate dependent) to the safety mechanism at the top, which will trip if there is a problem with the film in that part of its path. The film then passes onto a roller near the projector’s SDDS unit, through the projector in the usual way and out to a roller about six inches off the floor. From here it returns to the pillar, usually via the adjustable roller, which can be moved forwards or backwards to align it with the roller level to the playing onto plate. The film passes around the arm prior to wrapping around the plastic ring (plate spins anti-clockwise). If this arm slackens to its resting position at any point, then this acts as a safety trip, inferring a film snap, and shutting down the running projector if it is coupled to the platter.
d) Winding bench
The winding bench is set in front of the platter, at the same level as the middle of the three plates. Once film has been made up onto a 2000 or 6000 foot spool, it can be wound onto the plastic ring on the middle plate, with the foot of the film ending out on the platter. Setting the middle plate to the on/off winding bench setting (see figure above for control box), then allows control of the platter from the dials on the front of the winding bench.
The switch determines whether film goes to or from the platter and bench, with the large circle representing platter and small the bench. To start the winding (on or off) turn the speed dial as far as it will go anticlockwise. This will start the movement very slowly. This can then be increased as suitable. To stop the winding, press the red button on the front of the winding bench – turning the speed down as far as possible will not stop bench or platter from turning, it will merely slow them significantly.
Lacing
To prepare for projection of film on the platter, the following series of steps should be taken, in the order given.
a) Control box set-up
When preparing to lace the platter, remove the sheet covers for both the plate containing the film to be played and an empty plate on to which the film will wind. All three of the dials should be set to off. Turn on the platter and press the lacing reset button on the platter’s control box.
Now set the two relevant dials to their desired positions (film onto or off the relevant plate). Lift the mettle lever on the inside of the plastic ring around which the film is wrapped. This will cause the ring to shrink slightly, allowing it to be lifted out from within the film. Take care to detach the film from the notch in the plastic ring when you lift it out! Once the ring has been removed, push the lever back to parallel with the ring to expand it once more. Then place the ring on the plate to which you wish to play the film, using the small holes in the platter and the small metal dowels on the ring for guidance.
b) The brain
Place the brain into the socket of the plate on which the film is located. Whilst holding the movable arm towards you (to prevent the plate from turning), lace the film through the brain up to the point at which it exits. Remember at all times that the platter can be very dangerous and that as such, especially whilst lacing, projectionists (and their trainees) should not have long untied hair, or dangly jewellery exposed.
c) Wall rollers from and back to the platter
Once the brain has been laced, follow the instructions as given in section 2c, up to the top of the metal girder, ensuring that the film’s soundtrack remains either (i) up – whilst in the orientation that it occupies whilst on the platter; (ii) towards the wall – whilst running parallel to it, or; (iii) towards you – in the same manner as it is on the projector. From the top of the girder, pull the film (without twisting it!) around the bracket at the top of the projector, then back under, before immediately it to the bottom roller on the platter’s metal girder. Now return the film to the take-up plate via the safety arm, wrapping the film around the plastic ring for a whole rotation.
d) Lacing the projector
Now the film can be pulled onto the rollers above and below the projector, whilst ensuring no twists are made. Then pull excess film down from the top (never pull back on film that is on its way back to the platter from the projector!) Give yourself ample film to lace with in the projector, not worrying about any potential excess between the roller near the bottom of the projector and the bottom roller on the platter’s metal girder.
Lace the film without worrying about the racking (since you’re currently dealing with the platter leader – the lace-on points should come later on the piece of film) and wind through some film manually to check that everything is running smoothly. Now use the take-up button on the controller to take-up any slack between the bottom two rollers, in addition to pulling the safety arm approximately half way between its resting position and the wall. At this point use the P1/Null/P2 dial in order to allow for connection of platter to projector
Return to the projector and use the run button to get to approximately two numbers before your lace-on point (eg: near 5 if lacing on 3) and wind through manually till the next number is in the gate (eg: 4 if lacing on 3). Now ensure that the racking is good, adjusting loop sizes if it has been necessary to correct the racking. Once happy, wind through the film manually to its intended lace-on point, prior to once again taking-up the film with the arm set as before. Your film is now ready to be projected.
Brain wrap
Whilst the film is playing off the platter, it is important to remain in relatively close proximity to the platter. One of the potential problems that can be encountered is that of a brain wrap. This occurs when, rather than the innermost single layer of film releasing to play into the brain, several layers move at once. This is more likely with an old or damaged print where stickiness causes the film to stick together. Because the second layer (and any more that have been pulled) of film in is in a complete loop around the brain, it pulls in, contracting around the brain and stopping the flow of film. The film will then pull tight, damaging itself and potentially the rollers, so vigilance is required at all times, even though the safety mechanism on the wall should shut the projector and platter down.
How to leave the platter
Once your (piece of) film has finished and is wrapped around the plastic ring on one of the plates, it is important to leave the platter in a suitable manner. The most important thing to do is to set the platter back to null via the P1/Null/P2 dial. If this is not done, then if the next projectionist tries to project off a reel on the connected projector, then the platter’s arm safety will think there has been a snap and will trip, shutting down the projector.
During the Spring and Summer terms, it is common for WSC to use the platter for the ads and trailers reel, as a means to familiarise the trainees with it and when this is done it is crucial to set the platter to null during the first reel of the film, as otherwise, the second reel (played on the same projector as the platter had been) will be shut down via the safety tripping. Note: If the platter is not nulled, then the safety is active, regardless of whether or not the platter is on or has itself tripped on the distribution board.
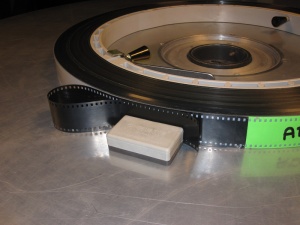
Once the platter has been nulled, any adjustments can be made (eg: film removal or addition). If there is film on the platter then its loose end should be looped back on itself and kept in place against the rest of the film with the puck. All plates of the platter should be turned off, as should the platter itself.
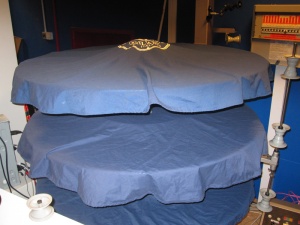
Once finished with, all three plates of the platter should be covered with their cloths, to prevent dust and reduce the risk of accidental damage to the film.
